
Last year, we moved to using Pulumi to provision our environments (about 100 of them), each with its own GCP project including multiple cloud resources such as permission, network definitions, buckets, etc. When we started using Pulumi, we already had 80 environments in place. Ultimately, we wanted all the environments to be managed through Pulumi.
“So let’s just import the cloud resources!” you say.
Here’s the thing…it’s not as simple as “just importing.”
In this post, we will detail how we imported all of our environments, with tweaks and tricks to help you along the way.
Setting up the Pulumi Project
Configurations are managed in Pulumi in one of two ways. Either they are managed in the code itself or they are held as yaml configuration files that are parsed by the code.
In our case, each environment has its own yaml configuration file, that is used by our code, written in Python:
  gcp:project: my-project
  pulumi-gcp:iam_bindings:
  - members:
    - name: service-account-1
      type: serviceAccount
    role: roles/compute.admin

  pulumi-gcp:service_accounts:
  - display_name: service-account-1
    id: service-account-1

  pulumi-gcp:kms_configurations:
  - key_ring: my-keyring
    key: my-key
    imported: true

  pulumi-gcp:buckets:
  - name: my-bucket
    location: US

  pulumi-gcp:buckets_iam_bindings:
  - members:
    - name: serviceAccount:[email protected]
      type: serviceAccount
    role: roles/storage.admin
    bucket: my-bucket
Getting an Existing GCP Project Under Pulumi Management
We split the process into two main steps:
Importing the existing cloud resources into the Pulumi stack
We needed to safely and automatically import the resources from our existing GCP project. You can do this in one of two ways: by fetching Google resources into a JSON or by adding the necessary code addition.
We preferred the second option. To do this we created a process to fetch and convert the resources into JSON using Google commands.
The JSON is used by the Pulumi import command to add the resources to the relevant project stack.
Now that the Pulumi stack was our “point of truth” — it contained all the imported resources — we disabled the old method of adding cloud resources to ensure that from now on all resources are managed exclusively by Pulumi.
Exporting the Pulumi stack into the YAML configuration file
With the stack in place, we needed to be able to manage it routinely. For this we created the YAML configuration files that are parsed by our code, and that should match the configurations of the imported resources.
You can do this in one of two ways; by fetching Google resources as a YAML file or by retrieving the Pulumi stack as a YAML file. We preferred the second option, which avoids a mismatch between the Pulumi stack and the YAML configuration file.
Importing Existing Cloud Resources into the Pulumi Stack
In this example, we will demonstrate how to import existing service accounts from the GCP project, but you can use the same method to import any cloud resource.
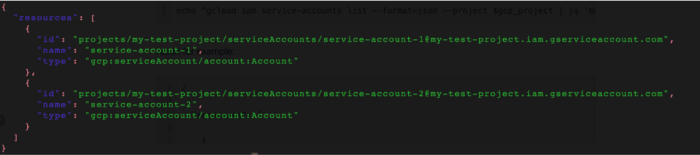
For the importing stage we used the next “gcloud” command to generate the JSON needed for the Pulumi import command. But you can use any JSON parser to bring the output to the right structure.
gcloud iam service-accounts list --format=json --project $gcp_projectThe resulting JSON looks like this:
After the JSON is properly generated, we can now run the necessary import command into the relevant stack:
- pulumi login –cloud-url gs://pulumi-$gcp_project
- pulumi stack select $gcp_project
- pulumi import -f resources.json –yes –non-interactive –color always
Exporting the Pulumi Stack into YAML Configuration File
For the exporting stage we used the next Pulumi command to convert the Pulumi stack into the needed configuration file. Also, here you can use any string parser to bring the output to the right structure.
pulumi stack --show-idsAs we mentioned, we’re using YAML for our configuration files, but this is true to any configuration structure you want to use.
The results look like this:
  pulumi-gcp:service_accounts:
  - display_name: service-account-1
    id: service-account-1
    imported: true
  - display_name: service-account-2
    id: service-account-2
    imported: true
After the resources are successfully imported and the YAML configuration has been created we can now run Pulumi to make sure all the resources can be properly managed by Pulumi.
A few notes on the process:
- When a Pulumi resource is being imported, by default it is imported with protect=True, which protects the resource from being deleted if you didn’t add the relevant code first. We recommend to keep it as it is, and only remove it after making sure the entire import process succeeded.
-
Import may fail for a variety of reasons and you may want to roll back an import of a specific resource. This is done with the following command:
pulumi state delete –force.
-
We found the –show-urn command very helpful when verifying the resource details in the stack:
pulumi stack –show-urn
Summary
Overall, importing cloud resources into Pulumi can be a simple process, as long as you plan it in advance and use the commands we mentioned above.